Linked Audiences
Engage Foundations requires a Business tier account and includes Unify.
See the available plans, or contact Support.
Linked Audiences is in private beta
Linked Audiences is in private beta, and Segment is actively working on this feature. Some functionality may change before it becomes generally available.
With Linked Audiences, you can use the relational data you’ve defined in your Data Graph to build audiences and send them to your downstream actions-based destination.
From the relationships you’ve defined between the profiles and entities in your warehouse, you can filter on an entity, profile trait, and audience membership conditions to create hyper-segmented audiences.
Linked Audiences warehouse support
At this time, Linked Audiences only supports Snowflake.
Linked Audiences permissions requirements
You must have Workspace Owner or Unify Read-Admin, Entities Admin, and Source Admin permissions to set up Linked Audiences Activation.
Getting started
To help you get started with Linked Audiences, consider the following best practices:
- It may be helpful to first identify an entity that is directly associated with your users, such as
Accounts,Households, orOrganizations. - From there you can define relationships between this entity with any of the other entities that may be associated with it, such as how
Accountscan have the following:Subscriptions,Purchases, orCarts. - You can create entity relationships up to four levels in depth. For example, an entity condition that queries for relationships between
Profiles,Accounts,Credit Cards, andTransactionshas four levels of depth. - To further refine your audience, identify column values that you might want to filter your entities by, or configure profile traits and audience membership conditions.
Step 1: Build a Linked Audience
You can build a Linked Audience from profiles associated with an entity, trait, or existing audience.
- Navigate to Engage > Audiences.
- Click + New audience, then select Audience.
- On the Select Type screen, select Linked audience, then click Next.
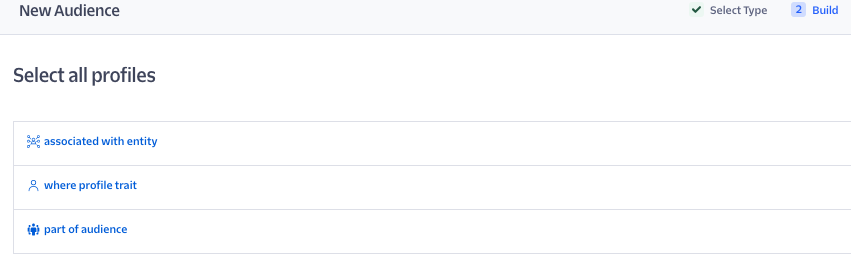
- Select one of the following conditions to build your audience from:
- associated with an entity: creates a condition that filters profiles associated with an entity.
- where profile trait: creates a condition that filters profiles with a specific trait.
- part of an audience: creates a condition that filters profiles that are part of an existing audience.
- Preview your audience, then click Next.
- Enter an audience name and description, then click Create Audience.
After creating the audience, you’ll be redirected to the Overview page. By default, the audience is disabled. You’ll need to manually enable the audience for the audience to compute.
Edits and deletes are not currently supported for Linked Audiences. Segment recommends recreating your existing Linked Audience. To disable an audience, navigate to the Settings tab of an audience and toggle the Enabled button off.
Custom traits
You can build Linked Audiences based on custom traits. These traits can be collected from your apps when a user completes a form or signs up using an Identify call. You can view these traits in the Profile explorer, as well. Custom traits are mutable and update to the latest value seen by the user’s Identify events.
When a Linked Audience that previously generated Identify events is deleted, the data for the audience key is still attached to profiles that entered the audience, and becomes visible in Segment as a custom trait.
Entity conditions
You can build Linked Audiences based on relational data from the data warehouse. Creating an entity condition will allow you to traverse the nested entity relationships defined in the Data Graph, as well as filter on entity properties at each level.
Compute statuses
Engage displays the following compute statuses for Linked Audiences.
| Computation status | Description |
|---|---|
| Computing | Engage is computing the Linked Audience. |
| Live | Users will enter the audience as it’s computed on the scheduled hourly cadence. |
| Disabled | The Linked Audience is disabled. |
| Failed | The computation was cancelled or failed to compute. Please contact Segment support. |
Use cases
Below are some example use cases to help you learn more about Linked Audiences.
Use case 1: Build an audience of users who have a credit card with an outstanding balance
To build this audience, you’ll need to define a nested entity condition to relate a Profile to their:
AccountentityCredit Cardentity wherecredit_card.balanceis “Outstanding”
In the Data Graph, Account and Credit Card are defined as entities and represented as separate tables in your data warehouse. Relationships are defined between:
ProfileandAccountAccountandCredit Card
In the warehouse, credit_card.balance is a column in the Credit Card table. By filtering against the credit_card.balance column for the “Outstanding” value, marketers can return a list of users that have a credit card with an outstanding balance.
Use case 2: Build an audience of cat owners who are also a part of the platinum membership tier
To build this audience, you’ll need to define a nested entity condition to relate a Profile to their:
HouseholdentityPetentity wherepet.typeis “Cat”
You’ll also need to define an audience membership condition to filter for users that are a member of the “Platinum membership tier” audience.
In the Data Graph, Households and Pets are defined as entities and are represented as separate tables in your data warehouse.
Relationships are defined between:
ProfilesandHouseholdsHouseholdsandPets
In the warehouse, pets.type is a column in the pets table. By filtering against the pets.type column for the “cat” value, marketers can return a list of users that have a cat.
Furthermore, adding the audience membership condition will allow marketers to further refine their audience to only include users who are part of the “Platinum membership tier” audience.
Use case 3: Build an audience of credit card holders with a certain number of transactions
To build this audience, you’ll need to define a nested entity condition to relate a Profile to their:
AccountsentitySubscriptionsentity wheresubscriptions.tieris “Premium”Transactionsentity wheretransactions.countis greater than five
This nested entity condition has four levels of relationship depth.
In the Data Graph, Accounts, Credit Cards, and Transactions are defined as entities. Relationships are defined between:
ProfilesandAccountsAccountsandCredit CardsCredit CardsandTransactions
In the warehouse, subscriptions.tier is a column in the Subscriptions table, and transactions.count is a column in the Transactions table. By filtering against the subscriptions.tier column for the “Premium” value, and the transactions.count column for values greater than five, marketers can return a list of users that have a premium account where there are greater than five transactions.
Step 2: Activate your Linked Audience
You can use your Linked Audience to activate any actions-based destination. The steps below provide instructions on how to add a destination to your Linked Audience(s), and send an event that best matches your use case.
Segment has preset mappings for Braze, Iterable, and Customer.io with many of the following steps already configured.
Some action destinations have limitations on nested objects, and the depth of the _entity_context property.
Step 2a: Add an action destination
To activate your Linked Audience, you first need to add an action destination.
From the Add destination window, select your destination and click Next.
Step 2b: Select event
After adding an actions-based destination, select what type of event you want to send to the destination. Events update the destination about changes to your entity or audiences. You can then use these actions to orchestrate campaigns in other tools.
You can send events:
- When an entity on a profile changes:
- Based on profile audience membership updates:
You can’t send events before you identify people. Ensure you’re making the profile(s) known in the destination before you send events. You can do this by sending an Audience Membership Changed event first, or by creating an Identify event in Connections.
Entity added
Send a Track event when the lowest entity branch matches the audience condition.
Example use cases:
- Send a reminder to a customer when a credit card associated with their profile has an outstanding balance.
- Notify a traveler when a flight associated with their profile is delayed.
- Notify a customer when a product associated with their profile’s wishlist is back in stock.
Entity removed
Send a Track event when an entity is removed because it no longer matches the audience conditions. Select your entity from the Select entity dropdown menu.
Example use cases:
- Send a confirmation to a customer when a credit card associated with their profile has been paid off.
- Send a confirmation to the primary doctor when each of their associated patients completes their annual check up.
Audience entered
Send a Track event when a profile enters the audience.
Example use cases:
- Send a congratulatory email when a travel qualifies for premium status.
- Send a discount to all customers with a particular product on their wishlist.
Audience exited
Send a Track event when the profile exits the audience.
Example use cases:
- Send an email to credit card owners to confirm that their credit cards have been paid in full.
- Send a confirmation to a patient when they have completed all their pre-screening forms.
Audience Membership Changed
Send an Identify event when a profile enters and exits the audience.
Example use case:
- Update a user profile in a destination with the most recent audience membership.
Step 2c: Select an action
Select the destination action to call when the event happens. Make sure the action you selected is relevant to the type of event you previously selected. For example, if you selected Audience Membership Changed, be sure your action is also an Identify event.
Segment displays available actions based on the destination action you’ve connected with your Linked Audience.
Visit the destination actions docs learn more about destination actions, and view available actions for your destination.
Step 2d: Configure the event
Configure your event and select additional properties to include in the event.
To configure your event:
- Select additional properties to include in each event.
- As you’re configuring your event, you can view a preview of the enriched event based on your property selections.
- Map your event from your audience to your destination.
- Braze, Iterable, and Customer.io are pre-set destinations, so you won’t need to map your audience to your destination.
- Select if you’d like to send events for current profiles and entities in the audience.
- This is only available for the entity added, audience entered, and audience membership changed event types.
- After configuring, click Save to enable your Linked Audience.
Send events for current profiles and entities in the audience
This box is unchecked by default. If you leave this box unchecked, Segment only sends events for new profiles and entities that match the audience conditions.
However, if you select this checkbox, Segment will also send events for profiles and entities that currently match the audience description.
Step 3: Confirm the payload in your destination
Linked Audiences sends events to your destination after Segment computes the audience.
To confirm your destination is receiving events, Segment recommends that you log in to your destination and perform one of the following:
- Monitor the event activity
- Search for the
UserIDorEvent Name(for example,Entity Added)
This page was last modified: 31 Jan 2024
Need support?
Questions? Problems? Need more info? Contact Segment Support for assistance!